Будни
|
Дельталётная
|
Справка
|
Предисловие
Thank you for choosing our engine the CORS-AIR M 25 Y. We invite
you to spend some time reading this manual, which will let you discover
all the features of your engine. Advices on maintenance and operation
will help you to have a reliable engine and to preserve your investment.
Furthermore, we invite you to deliver this manual together with the
engine if you sell it, so it can be useful for the next owner as well.
The
manufacturer and the resellers are ready to answer your questions and,
if necessary, to solve every problem, because YOUR AND THE OTHER
PEOPLE’S SAFETY IS THE MOST IMPORTANT THING FOR US.
Данные владельца
Owner
Address
Serial number
Reseller
Address
Owner’s signature
Reseller’s signature and stamp
Date of sale
The Company reserves the right to make technical and aesthetic changes without
notice in order to improve the quality of the
product.
Cors-Air M25Y / Black
Devil
Технические параметры
Двухтактный
одноцилиндровый
Мощность 25 л.с.
Тяга 70 кг.
Объём 172,5 c.c.
Bore 65 mm.
Stroke 52 mm.
Степень сжатия 11:1
Максимальные обороты 7.500
rpm
Воздушное охлаждение
Piston of light alloy with 2 piston ring of cast iron S10 хромированные
Цилиндр с никасиловым покрытием
Head of die-casted light alloy with high percentage of silicon
Crankcase molten in alloy G –Al Si 9 UNI 3051
Connecting rod of steel 18 Ni Cr Mo 5 forged and copper-plated with
rolls fit for high speed
Carburettor diaphragm
Feeding reed valve with 4 petals on the crankcase
Electronic ignition type CDI (electric version) type TCI (manual
version)
Опережение зажигания 18°
при 7200 об/мин
Свечи NGK B8ES для жары, B7ES
для прохлады.
Редуктор ременный
поликлиновый с передаточным числом 1:2,46
(по заказу от1:2,2 до
1:2,6)
Рабочая температура
нагрева головки цилиндра 180°C, максимальная
температура 200°C
Топливо: смесь
качественного бензина 98 с 2% синтетического моторного
масла для двухтактных
двигателей
Расход топлива от 2,5 до
4,5 л/час в зависимости от нагрузки и скорости
Fixing to the frame 5 rubber antivibration mounts
Вращение: против часовой
стрелки со стороны пропеллера
МОМЕНТЫ ЗАТЯЖКИ Kg.m (Nm)
DECOMPRESSOR (only hand start version) 2,0 20
NUTS TO FIX THE HEAD 2,2 22
NUTS TO FIX HALF-CRANKCASE 2,5 25
BOLTS TO FIX THE BACK FLANGE TO THE CRANKCASE 2,0 20
NUTS TO FIX THE PINION TO THE FRONT PART OF THE DRIVE SHAFT 4,5 45
NUTS TO FIX BACK PART OF DRIVE SHAFT TO IGNITION HANDWHEEL (manual
version) 3,5 35
NUTS TO FIX BACK PART OF DRIVE SHAFT TO IGNITION HANDWHEEL (electric
version) 1,2 12
GAP BETWEEN COIL AND HANDWHEEL 0.4 mm
УСТАНОВКА
You can install the engine on the frame by using 4 rubber mounts of 40
mm
between the back flange and the engine mount. It is suggested to install
also the 5th
rubber mount (20x30), fixing it in the proper hole located under the reduction
flange, through an angular square. This device will permit to evenly
distribute the
vibrations of the engine on every part of the frame.
To attach the propeller use only bolts of class 10/8 (100 Kg) and make
sure that
their length is enough to exit from the reductor-pulley. Tighten the 6
bolts M8 in a
cross, at 1.5 Kg.m.(15Nm).
Re-check the torque of the bolts after the first hour of engine’s
working.
For the connection between the carburetor and the fuel tank use a proper
hose of
the right diameter (1,2 times the max. expenditure per hour, that means
sending 11
liters/hour). The length of the fuel line must not be more than 80 cm.
It is advisable to install a manual primer bulb to get the fuel to the
carburetor
before for starting. This device will allow the fuel to arrive to the
carburettor,
protecting in this way the battery.
ВАЖНЫЕ ЗАМЕЧАНИЯ
Не запускайте двигатель
без винта.
DO NOT start the engine with loose bolts or parts, since this can cause
the
detaching of the propeller, the ovalization of the propeller holes, the
damage of the
electric start and the breakage of the rubber mounts.
ВАЖНО! ПЕРЕД ПОЛЁТОМ
ПРОВЕРЬТЕ КРЕПЛЕНИЕ КАЖДОЙ ЧАСТИ , ОТ
ДВИГАТЕЛЯ ДО КАРКАСА!
Verify that there are no damaged electric wires, that there are no leaks
from hoses,
tank, carburettor or engine’s crankcase, that the propeller is not
damaged or loose,
that the exhaust-pipe has no cracks, that the frame is not bent or
broken because of
falls, that rubber mounts are not cracked, that the reduction belt is
not loose and
every bolt is tight.
После проверки вы можете
запустить двигатель, прогрев его на оборотах от
2.200 до 2.700 до
температуры головки цилиндра около 120 °C.
ТОПЛИВО
Use for the mixture only premium gas for cars 98 octane, together with
goodquality,
synthetic oil for mixtures at a quantity of 2% .(НЕ ИСПОЛЬЗУЙТЕ ГОТОВУЮ СМЕСЬ
С БЕНЗОЗАПРАВОК).
ВАЖНО: в очень жарком
климате и при жаре готовьте смесь с 2,2% масла.
When you prepare the mixture, make sure that the can has not dirt or
water in it,
всегда заливайте сначала
масло, а потом бензин и хорошенько перемешивайте.
Никогда не запускайте двигатель без воздушного фильтра, так
как грязь и пыль,
поднятые винтом, попадут в двигатель.
РЕГУЛИРОВКА КАРБЮРАТОРА
The carburettor has two mixture adjustment screws, 1 marked L adjusting
low
speed and 1 marked H for high speed.
In order to make the adjustment, gently tighten clockwise then unscrew:
L screw
from 3/4 (three quarter) to one turn, H screw from 1 1/4 (one and a
quarter) to 1
1/2 (one and a half) turn -adjustment with filter Air Box (Kart model),
we advise
this kind of air-filter-. Furthermore, we advise to put a small
security-cable on the
air filter, on the muffler, to avoid that it can come off, and on the
three springs of
the exhaust . These adjustments can be different on the basis of weather
conditions
and flight altitudes. Ideal mixture is reached when the insulator of the
spark
plug is coffee brown; if the colour is black, the mixture is too rich,
therefore turn
screw H clockwise 1/8 round per time. If the spark plug is grey/white,
the mixture
is lean, therefore turn screw H and L counterclockwise always 1/8 round
per a
time. Remember that if the mixture is too lean, THE PISTON CAN SEIZE.
You
can see better the colour of the spark plug by keeping the engine for 20
seconds at
maximum speed and switching it off suddenly without letting it slow
down. Once
you have found the perfect mixture do not change it unless you change
flight place
or climate conditions, since register screws can be damaged by continuous
adjustments.
ОБКАТКА
All CORS-AIR engines, before being delivered, are subject to a severe
qualitycheck,
in order to verify if all the components respect the fixed parameters,
but a
further running-in is anyway necessary. A GOOD RUNNING-IN WILL PROLONG
THE
LIFE OF YOUR ENGINE.
Go to a quiet place, put a thick rubber carpet under your craft to avoid
that stones
or other things damage the propeller by putting it on earth and let the
engine
work at a speed of 2500 rpm for 5 minutes, then regulate speed at
3000/3500 rpm
for 15 minutes, then at 4000 rpm for other 15 minutes. Switch off the
engine and
check that there are no loose nuts or bolts and that every component is
ok. BE
CAREFUL NOT TO TOUCH HOT PARTS (POWER UNIT AND EXHAUST
PIPE). Start the engine again and take it step by step to 4000 rpm for 5
minutes,
then accelerate to 4500 rpm for 15 minutes.
На протяжении первых 10
часов работы не подвергайте двигатель предельным
нагрузкам и оборотам. В
период нормальной эксплуатации высокие нагрузки
(например, полёты с
пассажиром) могут ускорить износ двигателя.
ALWAYS CHECK at sight your craft before and after every flight, for
loose parts or
damage. After each flight, in the version with decompressor, clean the
head from possible
oil residues. During the run-in period vary the power often for a proper
piston ring setting.
ОБСЛУЖИВАНИЕ
- Каждые 20 часов:
Check the condition and gap (0.7 mm) of the spark plug
Clean the air-filter, the carburettor filter placed at the end of the
fuel pipe and the
filter of the fuel tank
Check the torque of every bolt
Tighten head nuts (in cross order) with a Torque Wrench at 2.2 Kg.m
(22Nm)
Check the tension and condition of the reduction belt
Check fuel lines
Check the wiring
Check that the cord of the starter has no abrasions
Grease the link-sphere between the manifold and the exhaust pipe with
lubricating
copper-grease suitable for high temperature (up to 1100°). If you can’t
find it on
the market , please ask to your dealer.
- Каждые 50 часов
Same controls of the 20 hours and furthermore:
Check the torque of the engine’s crankcase nuts
Change spark plugs
Change the petals of the reed valve
Check the reduction belt and the play of the pulley and change them in
case of
need
Check the conditions of the starter gears (version with electric start)
Once a year (independently from flight hours) change the diaphragm of
the
carburettor.
N.B. It is advisable to keep records of all maitenance in a log book for
the engine. It
is also advisable to install an instrument (CHT) to control the head
temperature at
sight.
НАТЯЖЕНИЕ РЕМНЯ РЕДУКТОРА. БУДЬТЕ ВНИМАТЕЛЬНЫ!
Attention: a belt which is “over tensioned” can do permanent damage to
the
bearings inside of the pulley hubs and drive shaft. Therefore we
strongly suggest
for you to follow carefully these instructions.
Before adjusting the belt take a felt pen or marker and make a small
sign on the
cam shaft and on the front of the reduction plate. This is your Zero or
start point
and from here you will be able to clearly see how much you move the
eccentric
tensioning cam in relation to the reduction plate. Remember “these are
Fine
adjustments” and we suggest not to rotate the cam any more than 1 mm per
adjustment. After each adjustment you can try to start the engine and
check the
result. If the engine does not start well then it usually means the belt
is still too
loose and is slipping - in this case repeat the operation by tensioning
the belt
another 1 mm. Consider that if the belt slips a little, but the engine
still starts fine,
then the tension is correct. Belt tension always increases automatically
when the
engine is running because of thermal expansion in the pulleys. Once you
have
found the correct tension , do not adjust it any more. In case of doubts
please
contact your paramotor dealer – or JPX Italia.
To adjust the belt do the following:
Loosen the safety bolt located high up behind the reduction mounting
plate and the
side bolt. Once these are loosened the you can turn the cam with a n.27
mm size
wrench - careful to observe the 1 mm increments. Once you have finished
turning
the cam remember to re-tighten the safety bolts, first the back bolt, by
keeping
firm the cam with the wrench, and then the side bolt.
ЗАЖИГАНИЕ (ТОЛЬКО ДЛЯ ДВИГАТЕЛЕЙ С РУЧНЫМ ЗАПУСКОМ)
In case the coil and/or the handwheel must be changed, it is compulsory
to turn to
your dealer or to trained personnel, even if this operation can appear
simple at the
first sight, since the timing of the engine, if wrong, can change the
performance
and cause damage to the engine. To check the timing: the distance
between the coil
and the flywheel magnet is 0,40 mm.
ДЛИТЕЛЬНОЕ ХРАНИЕНИЕ ДВИГАТЕЛЯ
In case the engine is not used for a long time, act like this:
Empty the fuel tank, included the fuel lines and the carburetor
Disassemble the battery (version with electric start)
Unscrew the spark plug and pour into the hole a teaspoon of oil for
engines, then
re-install the spark plug letting the propeller turn slowly by hand for
2 or 3 times
completely.
Disassemble the propeller
Loosen the reduction belt
Plug the hole of the exhaust pipe
Cover everything with a blanket and put it in a dry place
Once a month charge the battery and let the pinion of the drive shaft
turn by hand
2 or 3 times completely.
ГАРАНТИИ
CORS-AIR engines are manufactured with top-quality material, therefore
warranty is valid also for their accessories.
ПЕРИОД ГАРАНТИИ
1 YEAR beginning from the date of sell or exit from JPX ITALY
Warranty includes spare parts and labour, transport excluded.
WARRANTY IS VOID IN THE FOLLOWING SITUATIONS:
- Alterations to the engine not approved by JPX Italia.
- Wear & tear of components of the engine due to the instructions
within the product
manual not being adhered to.
- Accidental falls or dropping of the engine or its components.
- Overheating and seizure of the engine due to prolonged high speed
running of the
engine, running with excessive loads, running with inadequate loads,
running with
insufficient oil in the petrol (for a wrong tuning of the carburettor)
or running with
petrol only (oil mixture omitted).
- The presence of dirt, sand or foreign bodies in the carburettor of the
engine.
- Corrosion through bad storage of the engine or inadequate preparation
for storage of
the engine.
- Running the engine without an air-filter fitted to the carburettor.
- Miss-assembly of engine parts or components not assembled by JPX
Italia but by the
manufacturer of the paramotor or by the end user, supplied disassembled
for packing
and transport purposes.
- Corrosion of the engine or components emanating from stone chips or
any other
impact or abnormal stress damage.
- Work other than the maintenance set out in the product manual having
been carried
out on the engine by anyone other than JPX Italia or official dealers.
- Incidental or consequential loss or damage.
- Service bulletins from JPX Italia not having been adhered to.
- Engine used for racing use.
JPX ITALY AND ITS RESELLERS REMAIN AT YOUR DISPOSAL FOR
EVERY INFORMATION AND ADVICE ABOUT THE USE OF THE ENGINE.
УСТРАНЕНИЕ НЕИСПРАВНОСТЕЙ
ДВИГАТЕЛЬ НЕ ЗАПУСКАЕТСЯ
Check:
- switch on-off
- cable of the spark plug
- correct spark plug gap
- all the connections of the electric plant
- that fuel arrives correctly from the tank to the carburettor
ПРОМОКШИЙ ДВИГАТЕЛЬ
Dismantle the spark plug and dry it well ; before re-assembling it, let
the propeller
turn slowly 2/3 times.
THE ENGINE DOES NOT HOLD IDLE SPEED OR HAS AN IRREGULAR
SPEED
Clean and adjust the carburettor. Check the reed valve petals are
closing
completely. Hold the reed up to a light and you should not see any light
past the
petal seating area.
THE ENGINE CANNOT REACH MAXIMUM SPEED
Check cable pulling throttle fully open.
Check that there is no dirt in the carburettor or tank-filter nor
restrictions in the
fuel pipe, due to too tight curves, or air bubbles.
Check the spark plug; is it’s worn, change it with one of the same brand
and same
heat range.
In case the head is dismantled to be decarboned, change both the head
gasket and
the cylinder gasket.
SOME FINAL IMPORTANT ADVICE
НИКОГДА не запускайте
двигатель, если рядом с ним или по его сторонам находятся люди.
ОСКОЛКИ ПРОПЕЛЛЕРА могут
поранить людей на значительном расстоянии.
НЕ ДЕРЖИТЕ ДВИГАТЕЛЬ НА
ПРЕДЕЛЬНЫХ ОБОРОТАХ свыше необходимого времени.
Если вы используете
большие винты, ПОМНИТЕ, что охлаждение на высоких скоростях
хуже, поэтому держите под
контролем температуру головки цилиндра.
In addition, dismantle the propeller at regular intervals and
check that it is perfectly balanced, since an unbalanced propeller, even
slightly,
creates micro-vibrations which are not felt by the pilot, but can damage
seriously
parts of the engine with consequent breakages. Please do NOT forget that
the
propeller has mass and a considerable inertial moment, so it’s advisable
not to
vary suddently the RPM of the engine, both in flight and on the ground.
These
sharp and violent stresses could cause damages to the reduction, to the
engine, to
the belt and also possible deformations to the fixing holes of the
propeller.
Once you have found the perfect carburation, DO NOT modify it unless you
change flying place going to much higher or lower altitudes or unless
climate and
temperature are very different from the ones where you fly usually.
DO NOT FLY in bad weather conditions, you’ll fly the day after.
ПОМНИТЕ: ПОЛЁТЫ ДЛЯ УДОВОЛЬСТВИЯ,
А НЕ ДЛЯ РИСКА ВАШЕЙ ЖИЗНИ.
ХОРОШИХ ВАМ ПОЛЁТОВ И
БЕРЕГИТЕ СЕБЯ.
Комплект деталей двигателя
1) HEAD
2) CYLINDER
3) PISTON COMPLETE OF PISTON-PIN AND LOCK
4) PISTON RINGS (N° 2 pcs. together with the piston)
5) DRIVE SHAFT COMPLETE OF CONNECTING ROD
6) BEARING OF DRIVE SHAFT (n° Pcs. 2)
7) HALF-CRANKCASE
8) HALF-CRANKCASE
9) TIE-ROD HEAD/CYLINDER (n° Pcs. 4)
10) CRANCKASE STUD (n° Pcs.4)
11) GASKET OF THE HEAD
12) GASKET OF THE CYLINDER BED
13) JOINT DECOMPRESSOR WITH VALVE
14) DECOMPRESSOR
15) SEAL-RING OF DRIVE SHAFT (n° Pcs. 2)
16) COVER OF BACK SUPPORT BASE
17) BACK SUPPORT BASE
18) STARTER
19) COUPLER FOR STARTER
20) HANDWHEEL
21) COIL
22) REED VALVE
23) FLANGE FOR CARBURETTOR BED
24) CARBUTETTOR
25) FLANGE AIR FILTER
26) ADJUSTER FOR ACCELERATOR WIRE
27) * PINION (50 or 52.2 mm)
28) * PULLEY (115 or 130 mm)
29) BEARING OF REDUCTION PULLEY (n° Pcs. 2)
30) CAM OF THE PULLEY
N.B. BOLTS AND NUTS ARE NOT MENTIONED SINCE THEY ARE INCLUDED IN THE
PACKAGE OF THE SPARE PARTS.
* FOR THE PIECES MARKED WITH AN ASTERISK PLEASE SPECIFY SIZE.
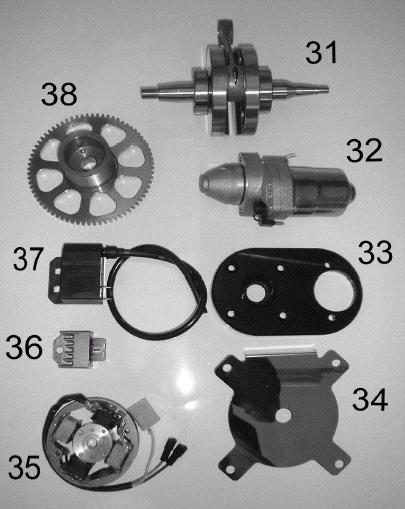
Части для M25 BLACK DEVIL с
электростартёром
|
|
31)
DRIVE SHAFT COMPLETE OF CONNECTING
ROD 32)
ELECTRIC STARTER 33)
FLANGE FOR ELECTRIC STARTER 34)
COVER OF BACK SUPPORT BASE 35) IGNITION 36)
CHARGE REGULATOR 37)
COIL 38)
CROWN WHEEL COMPLETE OF PINION |
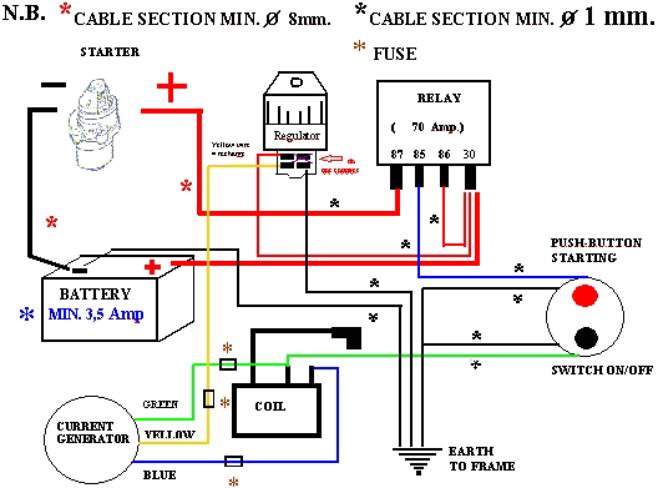
Электрическая схема
Будни
|
Дельталётная
|
Справка
|